Picky Kitchen
Burnt oven residue is more than an ugly brown stain. It can harden into a black, glassy layer around the door, floor, and side walls. The National Fire Protection Association’s Home Cooking Fires report recorded an average of 158,400 home cooking fires annually between 2019 and 2023. Cleaning will not eliminate every cooking risk, but removing heavy buildup supports safer, more controlled oven use.
So, how to remove stubborn burnt food from oven walls without damaging the enamel? The safest approach usually combines cooling, gentle softening, and patient scraping. Cleaning expert Melissa Maker often advises, “Let the product do the work.” That principle fits oven cleaning well. A damp baking-soda paste can loosen residue overnight, while a plastic scraper lifts softened flakes without gouging the surface. Harsh abrasives, metal blades, and mixed chemicals can create new problems. Always check the manufacturer’s manual first, especially before using a self-cleaning cycle.
Small details matter. Remove the racks. Protect the floor. Wipe in short sections. Expect a second pass. One treatment may not work. That is normal, and it deserves honest acknowledgment. Some baked-on spills contain sugar, grease, or melted cheese, so each may respond differently. This guide explains practical methods, safety limits, and the mistakes that often make oven walls harder to clean.
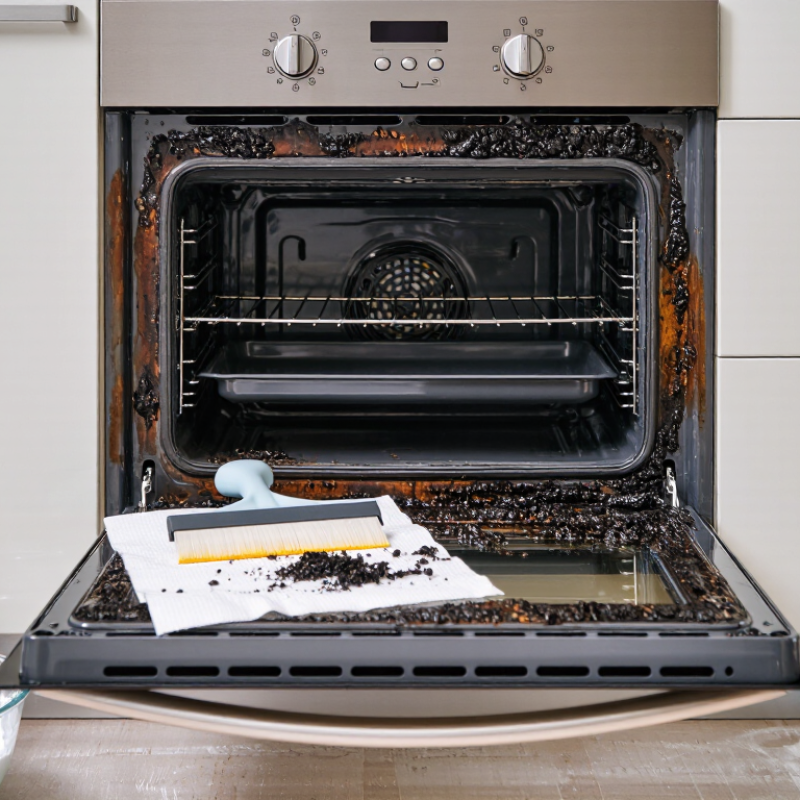
The best way to remove burnt food begins with identifying the oven liner. Check the owner’s manual before applying any cleaner. Porcelain-enamel walls usually tolerate a soft cloth and mild detergent. Catalytic liners are different. Their porous surface absorbs grease and may be damaged by scrubbing or chemical sprays. Self-cleaning ovens also require specific OEM instructions, because their cycles create extreme heat. Misreading the liner type can turn a small stain into permanent surface damage.
Burn severity matters too. A fresh brown film often loosens after warming the oven slightly, then wiping with a damp cloth. Thick, black carbon needs several gentle treatments, not one aggressive session. Remove racks first. Keep the oven cool enough to touch, ventilate the room, and never combine cleaning chemicals. The National Fire Protection Association reports that cooking equipment causes about 53% of reported home fires, so residue should not be treated as harmless decoration. A damaged gasket, flaking coating, or unusual smoke deserves professional inspection. I would rather leave one stubborn mark than scrape through the liner.
Tips: Photograph the liner and stain before cleaning. Compare both with the care section in the OEM manual. Use a plastic scraper only when the guidance permits it. Test any approved cleaner on a hidden area. Avoid steel wool and abrasive powders. If the first gentle attempt fails, pause and reassess; more force is not always better.
Cool the oven completely before cleaning it. Open a nearby window, switch on ventilation, and keep children away from the work area. The U.S. Consumer Product Safety Commission advises turning off heat and treating smoke or flames seriously. Ventilation also reduces exposure to irritating residue and cleaning vapors. Do not spray chemicals into a hot oven. That shortcut can create stronger fumes.
Use a plastic scraper, not a knife or metal blade, to lift loose carbon gently. Work around the walls in small sections. A dry cloth can collect flakes before they scatter onto the heating element. This process is slower than expected. That is acceptable.
The National Fire Protection Association reported an estimated 167,800 home cooking fires annually from 2018–2022, causing 135 deaths and about 3,088 injuries. Those figures reinforce the need to remove grease and debris without creating sparks or damaging surfaces.
CPSC guidance also supports avoiding unsafe tools and maintaining clear, usable cooking equipment. I would still inspect the oven manual before applying water or detergent, because coatings and heating elements differ. If smoke continues after cooling and cleaning, stop using the oven and seek qualified service.
Removing burnt food from oven walls often works better with patience than force. Turn the oven off, unplug it if practical, and wait until every surface feels cool. Remove loose crumbs with a dry cloth. Then mix one part water with three parts baking soda until it becomes a thick, spreadable paste. A paste that holds its shape works best.
Apply a generous layer over the carbonized spots, avoiding heating elements, vents, and door seals. Leave it undisturbed for 12–24 hours. The paste slowly softens the blackened residue. I once scraped too early and created more dust than progress. A plastic scraper or soft nylon pad can lift the softened layer without scratching enamel. Wipe repeatedly with warm, clean water. Several passes may be necessary.
Tips: Test a small hidden area first. Wear gloves and keep the room ventilated. Do not mix baking soda with bleach, ammonia, or other cleaners. Avoid metal blades and abrasive powders. If the residue remains hard, reapply the paste overnight rather than increasing pressure. Some ovens have delicate coatings, and even gentle cleaning can leave marks if the surface was already damaged. Check the oven manual before treating coated or self-cleaning interiors. Never apply paste to a hot oven.
Removing burnt food from oven walls requires patience, not force. Let the oven cool completely, then remove the racks and loose crumbs. Mix warm water with OEM-approved soap in a bowl. Apply the solution with a soft cloth, covering the dark, baked-on patches. Wait ten minutes. This softens grease without flooding the oven.
Use a nonabrasive pad on enamel or steel surfaces. Work in small circles, using light pressure. Rinse the pad often so loosened grease does not spread. A plastic scraper can lift thick residue, but keep it nearly flat. Never use a knife, steel wool, or abrasive powder. These tools can scratch steel and damage enamel. I once scrubbed too aggressively near a corner, and the finish looked dull afterward. That mistake changed my cleaning routine.
Tips: Test the soap on a hidden area first. Avoid heating the oven during cleaning. Keep water away from heating elements, vents, seals, and control openings. If residue remains, repeat the warm-soap treatment instead of pressing harder. Dry the walls with a clean towel, then inspect them under bright light. Some stains may remain discolored even after the food is gone. That is frustrating, but more scrubbing may cause permanent surface damage.
| Cleaning factor | Recommended approach | Practical details | Avoid |
|---|---|---|---|
| Fresh or lightly baked-on food | Wipe with a damp microfiber cloth after the oven has cooled. | Remove loose crumbs first. A short wipe-down prevents residue from hardening. | Cleaning a hot surface or pouring cold water into a hot oven. |
| Thick, hardened deposits | Soften the residue with a warm, damp cloth before gentle scrubbing. | Keep the cloth in place for approximately 10–15 minutes, then lift softened material carefully. | Scraping with knives, razor blades, or other sharp metal tools. |
| Porcelain or enamel-coated oven walls | Use an oven-safe, OEM-approved soap with a nonabrasive pad. | Apply the cleaner to the pad or cloth rather than flooding the cavity. Rinse with a clean damp cloth. | Steel wool, abrasive powders, scouring pads, and aggressive scraping that can scratch or chip enamel. |
| Stainless-steel interior or trim | Use mild approved soap and a soft, nonabrasive pad, moving with the grain. | Finish by wiping away soap residue and drying the surface to reduce water marks. | Chloride-based cleaners, steel wool, and scrubbing across the grain. |
| Oven door glass | Use a soft cloth or nonabrasive sponge with a suitable glass-safe cleaner. | Allow the glass to cool fully before cleaning and wipe both sides if accessible. | Abrasive pads, metal scrapers, and spraying cleaner into vents or door openings. |
| Heating elements and vents | Clean around them with a barely damp cloth only when the oven is cool and disconnected from power if required. | Consult the appliance manual before touching or removing any component. | Spraying liquid directly on heating elements, fans, controls, or electrical openings. |
| Heavy carbon buildup | Repeat the soak-and-wipe process instead of increasing pressure. | Several gentle cycles are safer for coated surfaces than one aggressive scrubbing session. | Mixing cleaners or using unapproved oven-cleaning chemicals. |
| Final inspection | Wipe with clean water, dry thoroughly, and check that no residue remains. | Leave the door open briefly to air-dry the cavity before the next cooking cycle. | Operating the oven while cleaner residue, pooled water, or loose debris remains inside. |
What Is the Best Way to Remove Burnt Food from Oven Walls?
Start with the oven completely cool. Remove loose crumbs with a dry, soft brush or cloth. Wear gloves, especially when old grease has hardened into sharp flakes. A damp cloth with mild dish soap can loosen fresh residue. For stubborn patches, apply a thick paste of baking soda and water. Leave it for several hours, then wipe gently. Do not scrape aggressively. Scratches can damage interior coatings.
Protect the heating elements, door gasket, and ventilation openings. Never combine cleaning chemicals, even if the oven looks heavily stained. I once rushed this step and spread greasy paste into a corner that was difficult to reach. That mistake made the next cleaning slower. Small areas are easier to control. Use a plastic scraper when necessary, and keep the cloth only damp, not soaked.
Use the self-clean cycle last. Pyrolytic cycles can exceed 800°F (427°C), turning baked-on food into ash. That intense heat may create smoke, strong odors, or trigger a kitchen alarm. Read the oven’s instructions first, remove approved racks and accessories, and ventilate the room. Keep children and pets away. Never leave the cycle unattended if local guidance or the manual advises otherwise. After the oven cools completely, wipe out the remaining ash with a clean, damp cloth. It is powerful, but it is not always the gentlest solution.
Turn the oven off and let every surface cool completely. Open a window and switch on ventilation. Keep children away from the area. Do not spray anything inside a hot oven.
Use a plastic scraper or soft nylon pad. Work in small sections with gentle pressure. Avoid knives, metal blades, and abrasive powders. Scratching the surface is easy.
Use a dry cloth to gather flakes before they reach the heating element. Wipe slowly around the oven walls. Small movements work better than force.
Mix one part water with three parts baking soda. Make a thick paste that holds its shape. Spread it over the blackened spots, avoiding vents and heating elements.
Leave it undisturbed for 12–24 hours. The paste needs time to soften the carbon. I once scraped too early and made more dust. Patience matters.
Lift it gently with a plastic scraper or soft nylon pad. Wipe with warm, clean water several times. Use gloves and keep the room ventilated.
Not necessarily. Test a small hidden area first. Avoid door seals, vents, heating elements, and delicate coatings. Check the oven manual before cleaning coated or self-cleaning interiors.
Do not mix it with bleach, ammonia, or other cleaners. Use one method at a time. Chemical fumes can become irritating, especially in a closed kitchen.
Stop using the oven and allow it to remain unused. Continuing may worsen the problem. Seek qualified service if smoke persists after cooling and cleaning.
The safest answer to how to remove stubborn burnt food from oven walls begins with identifying the oven’s liner material and checking the manufacturer’s care guidance. Allow the oven to cool completely, open windows or use ventilation, and remove racks and loose debris. Carefully lift softened flakes with a plastic scraper or other nonmetallic tool to avoid scratching the surface. Never use excessive force, sharp metal objects, or harsh chemicals unless specifically approved for the oven.
For baked-on carbon, apply a paste made from one part baking soda and three parts water, then leave it in place for 12–24 hours. Wipe it away with a damp cloth or nonabrasive pad, using only a mild soap approved for enamel or steel surfaces. Rinse and dry thoroughly, repeating the process if needed. Use the oven’s self-cleaning function only as a last resort, since pyrolytic cycles can exceed 800°F (427°C); remove unsuitable accessories and follow all safety instructions before starting.
